Pose Estimation on Custom Data using Ultralytics YOLOv8
In the evolving landscape of computer vision, pose estimation stands out as a pivotal innovation, transforming how we understand and interact with visual data. Ultralytics YOLOv8 is at the forefront of this transformation, providing a powerful tool that captures the subtleties of object orientation and movement within images.
Traditionally, tracking the keypoints of objects in images has been complex, but with YOLOv8, it’s becoming seamless and intuitive. This advancement is not just exciting — it opens up a world of possibilities across various sectors, including sports analytics, healthcare, and retail, to name a few.

In this article, we’re going to explore the process of pose estimation using YOLOv8. Here’s what we’ll cover:
- Data Annotation for Pose Estimation using CVAT: We’ll begin by uploading our dataset to the CVAT platform, configuring the tool, annotating keypoints, and exporting our data.
- Converting Annotations for Ultralytics YOLOv8: After annotation, we’ll convert the data into a format that’s compatible with YOLOv8, ensuring our model can interpret it correctly.
- Data Splitting: It’s essential to structure our data, so we’ll divide it into training, validation, and testing sets to facilitate effective model training.
- Training the YOLOv8 Model for Pose Estimation: With our data organized, we’ll train the YOLOv8 model to recognize and estimate poses.
- Performing Inference with YOLOv8: Finally, we’ll use our trained model to perform pose estimation on new data, seeing the results of our efforts in action. You can also explore our YouTube video on Pose Estimation with Ultralytics YOLOv8
Let’s get started 🚀
Annotation of Data using CVAT for Pose Estimation
The process of data annotation is crucial in the field of computer vision. We’ll be using the tiger dataset in this tutorial to demonstrate how to accurately annotate keypoints, which is an essential step in training our model for pose estimation.

Note: The tiger dataset, which can be accessed from the Ultralytics Tiger-Pose Dataset, should be downloaded and unzipped, preparing it for the upcoming tasks. These images will serve as the basis for our training process, so ensure they’re stored conveniently.
If you’re new to CVAT, it’s worth taking the time to familiarize yourself with its features by reviewing the CVAT Documentation. This will provide a foundation for a more streamlined annotation process.
Uploading the Dataset
After downloading the tiger images, be sure to unzip the file. Next, upload all the images onto the CVAT platform as a new task and click “submit and open.”
Once done, you will be directed to a page as displayed below.

Setting Up the Annotation Tool CVAT
Upon opening your task in CVAT, you’ll be prompted to select a specific job, which will be your workspace for annotations. The job number, like “Job #391317” mentioned here, will differ for each user. This will lead you to the annotation interface, where the setup will be complete, and you can begin labeling your data.

Data Annotation
With CVAT, you have the option to annotate using different formats. For the tiger dataset, we’ll utilize point annotation to mark keypoints. The process is visualized in a detailed gif provided in the tutorial, guiding you through each step of the annotation.

Data Export
After completing the annotation, the dataset can be exported using the “CVAT for images 1:1” format, which will be suitable for converting to the YOLOv8 format later in the workflow.
Converting Annotations to Ultralytics YOLOv8 Format
Once you’ve exported your annotations from CVAT, you’ll receive a zip file. Unzip this to reveal an “annotations.xml” file, which houses the keypoints and labels you’ve assigned. This file is crucial as it contains the structured data that YOLOv8 will learn from.
To integrate this with YOLOv8, place the “annotations.xml” file into the same directory as your image dataset. If you need to re-download the dataset, it’s available at the Ultralytics Tiger-Pose Dataset. Make sure that after downloading, you unzip the files, readying them for the next step.
Now, create a Python script titled “cvat_to_ultralytics_yolov8.py”. Copy the provided code into this new file. Running this script will convert your annotations into the YOLOv8 format, setting the stage for training your model.
import ast
import os.path
from xml.dom import minidom

out_dir = './out'
if not os.path.exists(out_dir):
    os.makedirs(out_dir)

file = minidom.parse('annotations.xml')

images = file.getElementsByTagName('image')

for image in images:
    width = int(image.getAttribute('width'))
    height = int(image.getAttribute('height'))
    name = image.getAttribute('name')
    elem = image.getElementsByTagName('points')
    bbox = image.getElementsByTagName('box')[0]
    xtl = int(float(bbox.getAttribute('xtl')))
    ytl = int(float(bbox.getAttribute('ytl')))
    xbr = int(float(bbox.getAttribute('xbr')))
    ybr = int(float(bbox.getAttribute('ybr')))
    w = xbr - xtl
    h = ybr - ytl
    label_file = open(os.path.join(out_dir, name + '.txt'), 'w')

    for e in elem:

        label_file.write('0 {} {} {} {} '.format(
            str((xtl + (w / 2)) / width),
             str((ytl + (h / 2)) / height),
             str(w / width),
             str(h / height)))

        points = e.attributes['points']
        points = points.value.split(';')
        points_ = []
        for p in points:
            p = p.split(',')
            p1, p2 = p
            points_.append([int(float(p1)), int(float(p2))])
        for p_, p in enumerate(points_):
            label_file.write('{} {}'.format(p[0] / width, p[1] / height))
            if p_ < len(points_) - 1:
                label_file.write(' ')
            else:
                label_file.write('\n')
After running the script, remove the “annotations.xml” to avoid any potential confusion in later steps.
Data Splitting (Train, Val, Test)
With your dataset annotated and converted, the next step is to organize the images and annotations into distinct sets for training and evaluation.
- Create two directories within your project: one named “images” and another “labels”.
- Distribute the images and their corresponding annotation files into these folders respectively.
- To facilitate this data-splitting process, create a Python file named “splitdata.py.”
- Copy and paste the provided code into the “splitdata.py” file.
- Execute the Python script by running the file.
This procedure ensures that your data is appropriately divided into training and testing subsets, primed for Ultralytics YOLOv8 training.
import splitfolders

input_fol_path = "path to folder, that includes images and labels folder"
splitfolders.ratio(input_fold_path, output="output",
    seed=1337, ratio=(.8, .2, .0), group_prefix=None, move=False)
The result will be an output folder comprising two distinct directories: “train” and “test.” These folders are ready for utilization in your YOLOv8 training process.
Training the YOLOv8 Model for Pose Estimation
The next phase involves crafting a “data.yaml” file, which acts as a roadmap for YOLOv8, directing it to your dataset and defining the classes for training. Insert the necessary code into ‘data.yaml’, customizing the path to your dataset directory.
For detailed guidance on configuring your tiger-pose dataset, refer to the Ultralytics documentation at: https://docs.ultralytics.com/datasets/pose/tiger-pose/#dataset-yaml
Please remember to adjust the dataset directory path as needed. With ‘data.yaml’ configured, you’re ready to commence training your model.
path: "path to the dataset directory"
train: train
val: val

kpt_shape: [12, 2]
flip_idx: [0,1,2,3,4,5,6,7,8,9,10,11]
names:
  0: tiger
Once this is completed, you’re all set to begin! You can employ the provided command to initiate the training of the YOLOv8 model for tiger-pose estimation.
yolo task=pose mode=train data="path/data.yaml" model=yolov8n.pt imgsz=640The training duration will vary, and it’s contingent on the GPU device you have.
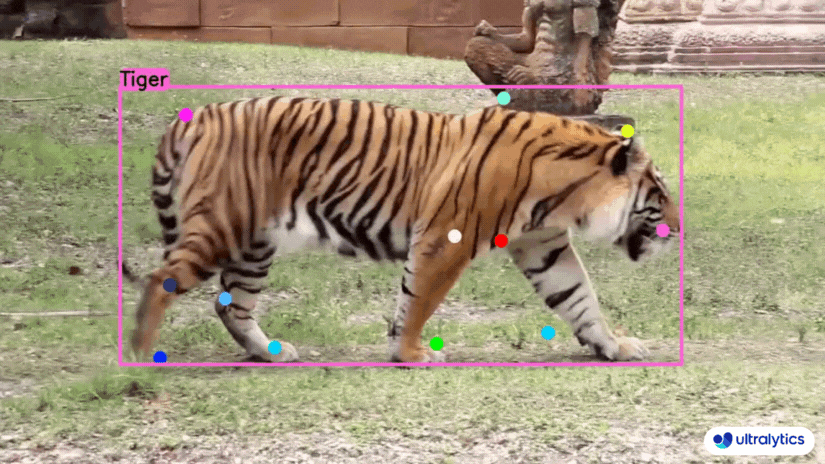
Performing Inference with YOLOv8
Following training, put your model to the test by performing inference on new data. Run the provided command to apply your pose estimation model to detect and analyze poses.
# Run inference using a tiger-pose trained model
yolo task=pose mode=predict \
source="https://www.youtube.com/watch?v=MIBAT6BGE6U" \
show=True model="path/to/best.pt"
The inference results will be displayed, demonstrating the model’s ability to apply what it has learned to real-world scenarios. See below:
As we wrap up this tutorial, we invite you to immerse yourself in the potential of pose estimation using Ultralytics YOLOv8. We’re excited to see how you apply these tools to your projects. Share your progress and discoveries with the community. Dive in and share your work with us! 🚀

Ultralytics is on a mission to empower people and companies to unleash the positive potential of vision AI. With a commitment to simplicity, flexibility, and usability, Ultralytics YOLO and Ultralytics HUB lower the barriers to getting started solving the world’s challenges. Ultralytics technology enables businesses to transform their operations, enhance customer experiences, and drive innovation by seamlessly integrating state-of-the-art models and user-friendly platforms. It’s been a remarkable journey, but we’re just getting started.